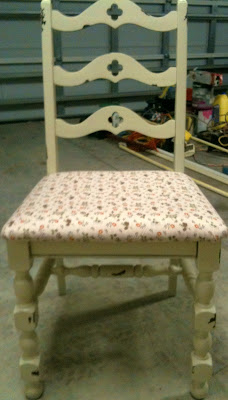
So anyway, I couldn't WAIT to get this chair home and start it's much needed makeover. I swung by Walmart and found the most perfect fabric. The best part? It was on sale and I paid ONE DOLLAR for all of it! I am crazy about bargain shopping, I can't get enough of it!! I picked up a couple of cans of spray paint and headed home to cozy up my chair.
This was an easy peasy project, so I didn't need many supplies. Two cans of Krylon spray paint, (almond colored) Vaseline, a staple gun, and my handy dandy spray paint gun thingy.
Taking off the seat of a chair is easy, just turn the chair over and you'll see where to remove the screws. Take them out and put your seat to the side. Then I grabbed my spray paint and my spray paint gun thingy and got to work! P.s. If you spray paint a lot you NEED to invest in one of these finger-saving inventions. I got mine at good ol Wally World for only 3 bucks and my spray paint days have never been the same. I don't know how I've made it this long without it!
I almost forgot, the Vaseline! I LOVE the chippy vintage look, so I'm going to share a trick I read about with you. Before you start painting, lightly brush vaseline wherever you want it to look chippy, let it sit for a moment, and then spray right over it! When the spray paint dries, you can see where the vaseline is and you can just sand right over it giving you that look you're going for. I love this tip and use it ALL the time! Hope it helps! ;)
It took a couple coats of paint, and while it was drying I started working on my cushion. I took off the old material, kept the padding, and starting measuring out the new material I bought. After I got the material lined up just right, I stapled the fire outta that chair! Make sure you always pull the fabric tight, so it will look right on the other side. I kept the corners folded neat and then stapled them down. The finished project?
Viola!
 |
 |

I am in
LOVE with this beauty and I want to keep it for myself!
I mean, doesn't it look perfect next to our fireplace??
KIDDING! It actually doesn't match any room in our house and I only bought it to sell with a desk I also repainted. I just brought it inside to google at it a little more. ;) I keep trying to mentally find a place for it around here, but I have to slap myself back to reality. I'm working hard on buying and selling these projects to buy my cute hubs something extraordinary for Valentines Day! Shhhh, don't tell him! More on that later. ;)
Giving furniture a new look is FUN and it doesn't have to be expensive! My whole chair project came to a total of 16 dollars! Now just imagine if you already had the piece of furniture! ;)
Happy Refurnishing!
xxx
Brittaney


No comments:
Post a Comment